keywords
- retarget tool
- rig transfer, motion transfer
- animation transfer, animation copy
- fbx, dae, bvh
In a Nutshell
- Create a new Avastar Character (or use an existing one).
- Import your BVH animation file.
- Map the corresponding Bones.
- Transfer the Animation.
Loading an animation file
Blender supports the import of BVH files out of the Box.
You find the importer in the Top menu at:
File -> Import -> Motion Capture (BVH)
Note: The SL default animations are all available as BVH files from the SL-Wiki:
We use the avatar_dance8.bvh for this document
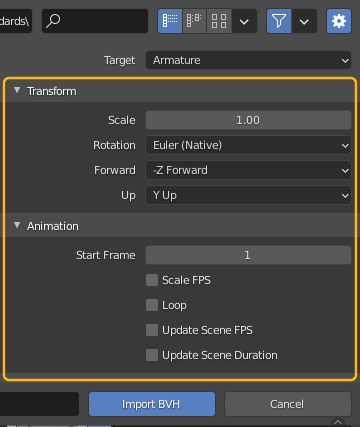
The Import options are at the upper right corner of the Import File Browser
Note: You can set – but you do not strictly have to set – the Scale factor to match the imported Armature and the Avastar armature. However if you do not fix the scaling during import then you can easily end up in a situation like in the image above.
Tip: If you import an animation that was made for Secondlife then its unit of measurement is Inches. In that case you can use the factor 0.0254 to rescale the figure to Blender units when you import the BVH file.
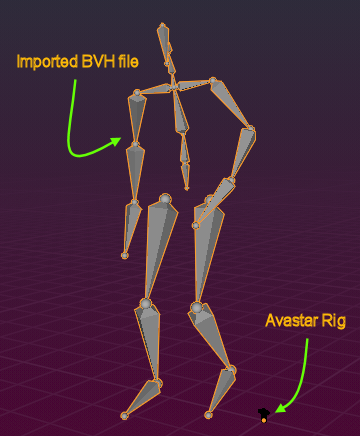
BVH File imported with wrong scaling
Quick fix for Scaling mismatch

The Match Scales function rescales the imported Animation rig in Object space to match the Avastar rig’s Skeleton. However, we get the scaling value only from the Z-Axis and apply the same scale to the X- and Y- axes as well. In most cases the result is good enough to work with. But you always can manually adjust the armature scale in Object mode.
Important: If you need to edit the rigs to get better results, then always(!) edit only the Avastar Rig. Do your editing before you do the motion transfer! Editing the imported rig will destroy your animation.[/box]

Note: If you take a closer look then you see the Avastar and the imported animation look in opposite directions. This is nothing to worry about. For some reason many of the internal animations have a starting pose that is rotated to look backwards. We have no clue why that is, but it is not of any harm.
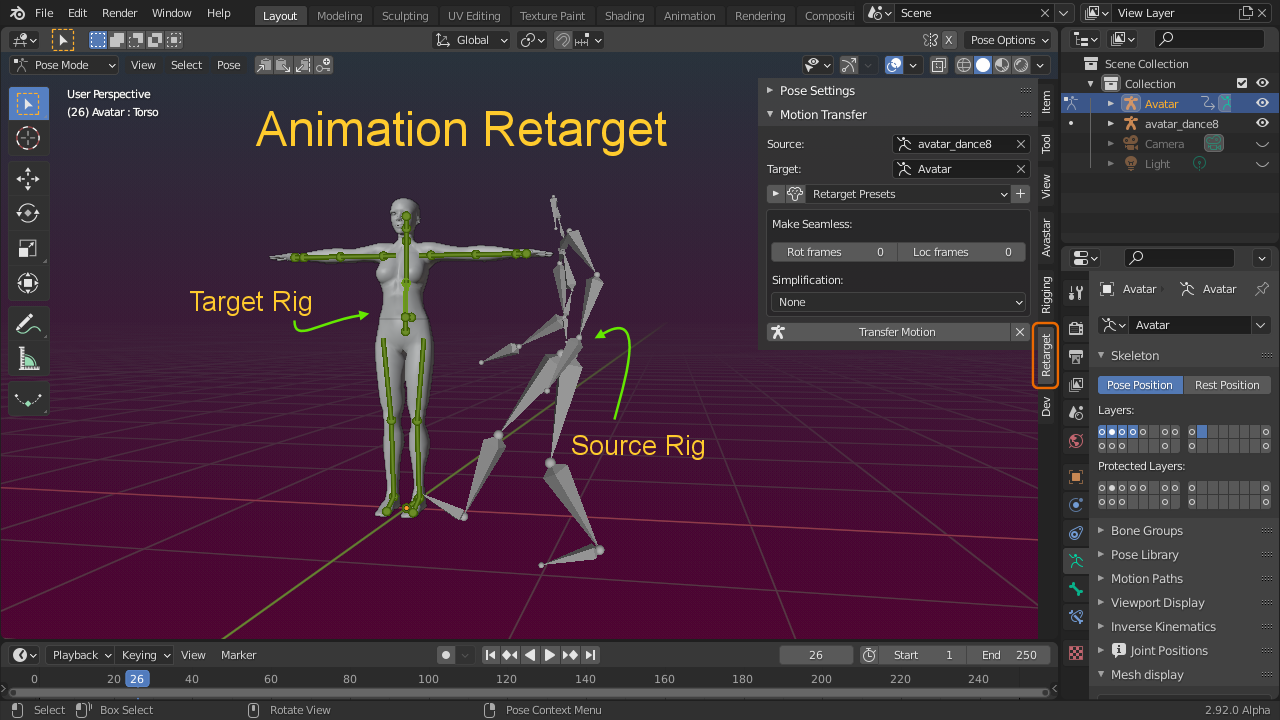
Mapping bones
When you import a BVH file, then the used Bones can have arbitrary names. Also your animation Rig can have different bones than the target Rig. This issue can be solved by using a Bone Map.
By default the Bone map is collapsed and hidden inside the Guess button. You can expand the Map by clicking on the small + Icon left to that button. A list of Bones shows up.
The left column (Target) is a read only list of Bones in the target Rig (Avastar in our case). While the right Column is a list of bone names which appear in the just imported Rig. Initially the Map is empty and you have to fill it manually.
But there is something better here …
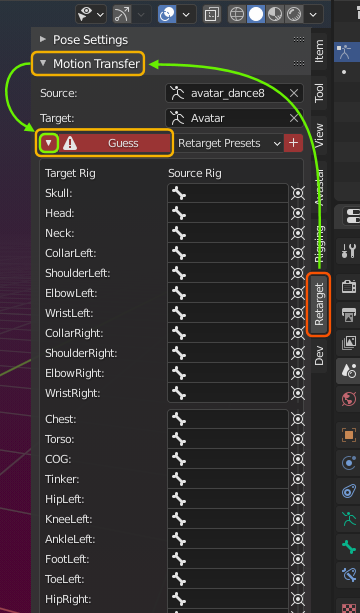
We have added a Map Guessing tool, which works nicely for Animations that already have been made for SL. You can just test the Guessing tool and see if your imported Animation rig is recognized.
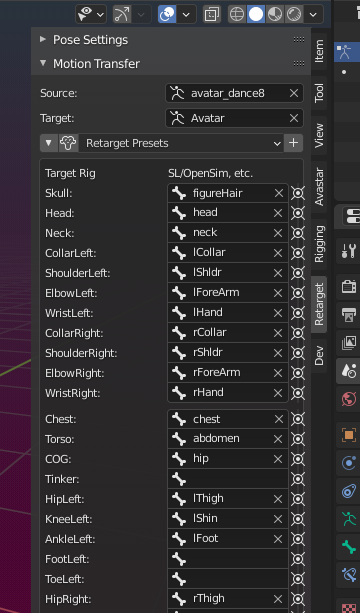
Note: After you click on the red Guess button, it is replaced by a Set of Retarget presets. Furthermore Avastar now figures out for you which of the presets is best matching and prefills all available bone mappingsaccordingly.
In our case the guessing tool has identified the Animation Rig to be an SL/OpenSim compatible rig, thus all available Bones are automatically assigned and we do not need to bother with that.
Note: Some mappings are not filled, for example Tinker, FootLeft and FootRight (see image) are not assigned to any bone in the imported animation. We do not need to bother with that for now.
The Bone Picker
ok, you are not happy with what the guessing tool has fabricated for you? Maybe it did not recognize the Rig, or it made mistakes in the mapping, or it did not find any mapping at all… For this case we have added the bone picker that allows you to quickly fix or build the bone map manually:
The Bone picker lets you select one Source bones from the Animation Source rig and manually map it to a bone on the Target rig:
- Open the Animation source Rig in pose mode
- Select a bone in the Source Rig
- Click on the corresponding assign icon in the map (see image)
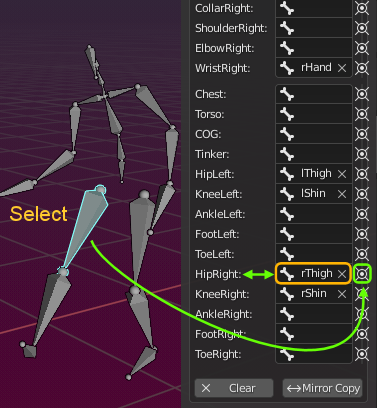
Now the source bone is assigned to the corresponding target bone (In the example rThigh of the Animation Source is assigned to HipRight in the Avastar target)
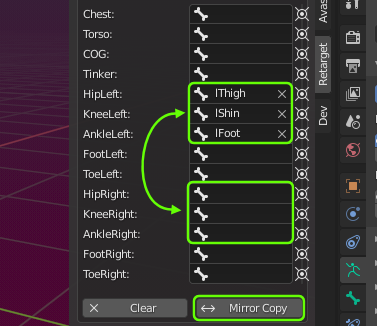
The Range Mirror Copy
The Range Mirror Copy lets you copy the limbs. Thus you only need to assign one half of the bones, then use this tool to automatic fill the symmetric bones on the other side.
- Assign one side of your animation source Rig to the corresponding bones in the Avastar rig
- Click on Mirror Copy to transfer the assignments to the other side of the Rigs.
The Clear Tool
The Clear Tool removes all associations in the Bone Map.
You will use this function only when you want to reset your mapping completely and restart from the begin.
Note: As soon as you have called the Clear tool, the Guess Button (see further up) becomes red again, indicating that no mapping is set.

Pose tools
After you have setup the mapping as described above, we also need one time frame in which the Source animation and the target animation have the same pose (or at least a closely matching pose). This Reference Frame will then be used as guideline for the transformation tool.
Important: If both Rigs use the same restpose then you can simply enable the Use Restpose option. Then the Ref Frame option is greyed out and you do not need to create a reference frame.

Notes on the Reference Frame
The Reference Frame is not required to be part of the transferred set of frames in the timeline. for example in most cases frame 0 in the timeline is not used by the imported Animation. So it could be used to create a matching pose.
Important: It is not required that the matching poses are Restposes! The only requirement is that both poses match as tightly as possible to make sure the animation transfer is precise.
Transfer Pose
If one of the two following conditions is matched:
- Either the Animation and the Avastar use the same Restpose
The Use Restpose option is enabled. - Or the Ref frame contains the same Pose for the
Animation Source Rig and the Avastar Target rig.
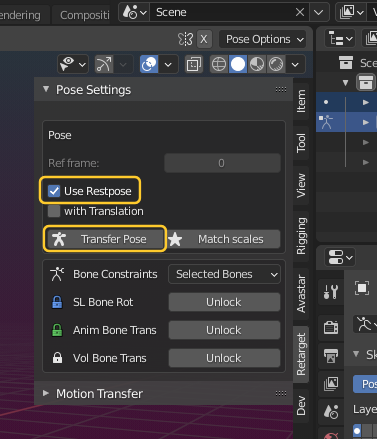
Only then it is possible to reliably transfer single poses from the animation into the Avastar: In that case the Transfer Pose tool transfers the pose of the current selected frame on the timeline from the Source rig to the currently selected Bones of Avastar Rig. You can select whichever frame you want to copy.

Timeline frame 18 before pose has been transferred
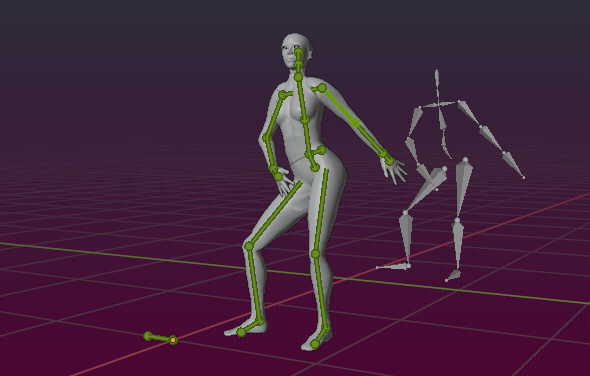
Timeline frame 18 after pose has been transferred
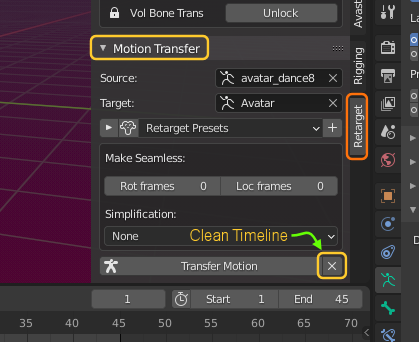
Make Seamless animations (experimental)
This tool is used when you want to create a periodic Animation cycle. Lets assume your imported animation was not exactly created for looping. then this tool can be used to interpolate rotation changes and location changes such that the first frame and the last frame of the animation loop smoothly.
The numbers define the timeline frame range over which the easing shall take place for Rot frames (rotation)and for Loc frames (translation)
Note: This feature is not yet available in Avastar 2.81.

Simplify (experimental)
Simplify can be used to reduce the number of key frames used in the imported Animation. We provide 3 options here:
- No Simplification (default)
- Lowes Global
- Lowes Local
These simplification methods are described nicely by Eyuphan Bulut in a scientific paper about Key frame extraction from Motion data
Transfer Motion

Clean Timeline
The little white cross is a nice helper tool too. Lets say you have found your animation is broken in the Avastar timeline, then you can wipe it out by clicking on this erase button.