Convert non Avastar rig to Avastar
This mode is entered when you have selected an arbitrary (not Avastar) Armature or one or more mesh Objects which are bound to an armature. In that case the conversion tool offers to Convert the Armature “in place”:
- The original Armature will be deleted
- A new Avastar Armature will be created
- The assigned mesh objects will be moved to the new Avastar.
- For the additional options see below
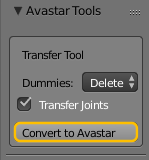
Convert a non Avastar Rig to Avastar (in Place)
This tool makes it also possible to integrate Mesh development kits from other creators into the Avastar Rig. Please watch the Demo video to see this option in action
Converting the Belleza Development Mesh
Th Belleza Developer Dummy can not be converted fully automatic because it has its arms in A-Pose. For Avastar 1.6 we have added a very easy way to convert this mesh to Avastar.
But for the current release (Avastar-1.5-9) you have to go through a rather lengthy process:
- Select only the Armature and delete it (in object mode)
- Select the Mesh and open its Modifier Stack
- Delete the Armature Modifier
- rotate around the z-axis by 90 degree: z -90
- go to front view the mesh should now look at you
- in the properties sidebar (‘n’ sidebar) in the Transform Section locate the Scale panel
- set scale for all 3 axes to 1.0 (it is currently set to 0.01) (DO NOT APPLY SCALE, SET IT MANUALLY to <1,1,1> ! )
Now the mesh becomes 100 times bigger(!) - Below the Scale panel you find the Dimensions panel. Check that the mesh is about 1.753 blender units high. If this is not the case, then you made something wrong. Check the previous steps. Something has gone wrong there.
- Select the Belleza Mesh and Apply Rotation (from within the 3D View toolbar)
Make sure that you have prepared your Mesh as described above. Only then proceed!
- Add a new Avastar character
- go to pose mode
- Rotate ShoulderRight/Left by 45 degrees (into a pose)
- set the avastar sliders as follows:
- Height: 52
- Head size: 72
- Eye Spacing: 50
- Neck Thickness: 67
- Shoulders: 56
- Breast Bouancy: 44
- Breast Cleavage: 19
- arm length: 51
- Torso length: 51
- Leg Length: 52
- Butt size: 30
- Hide the Avastar meshes (or delete them if you prefer)
- In the tool shelf set the SL Rigging Style to “Fitted Mesh”
- In object mode select the Belleza Mesh and the Avastar armature
- In the Skinning Panel: Select weight: Keep
- Enable the “Alter to Restpose” option
- Bind to Armature
- Select the armature
- in Appearance Control Enable “SL Appearance”
Now the Appearance sliders should work and the Belleza Mesh is rigged to Avastar.
Update old Avastar Rig to newest version
This mode is entered, when you have selected an older version of an Avastar Armature (by opening an older project blend file for example) or you selected a mesh that is bound to an older Avastar Armature. In that case the conversion tool offers to Update the Armature “in place”
- The original Armature will be deleted
- A new Avastar Armature will be created
- The assigned mesh objects will be moved to the new Avastar.
- All possibly edited Bones (Joints) will be transferred.
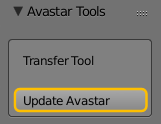
Update an Old Avastar Rig to the newest Version (in Place)
Copy an Armature to an existing Avastar
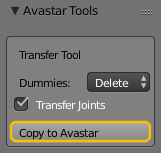
This mode is entered, when you have selected 2 armatures, of which the active Armature is either an outdated Avastar armature or an arbitrary non Avastar Armature, and the other armature is a new Avastar Armature. In that case the conversion tool offers to Copy the Active Armature’s configuration to the other selected Armature:
Copy Avastar to Avastar
- The original Armature will be kept
- All possibly edited Bones (Joints) will be transferred
- For the other options see below
Copy an (old) Avastar Rig to another Avastar Rig
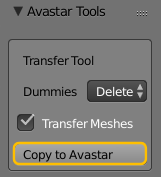
Copy SL Compatible Rig to Avastar
- The original Armature will be kept
- The assigned mesh objects will be copied to the Avastar.
- For the other options see below
Copy an SL compatible Rig to an Avastar Rig
Options
This option controls the Avastar Meshes in the Target Armature. Depending on the use case you will want Avastar to handle these meshes differently :
- Keep: Use for Mesh Attachment creation
- Hide: Use for Human Character Creation
- Delete: Use for non Human character Creation
When your Armature has been edited, then you need to copy the modified bones to the Target Armature. Functionally all that is needed is to transfer the relative position of the bone joints.
You might want to only copy the Armature settings to the Target Armature