Suppose you start a fresh Project with an empty scene. You already have downloaded your personal Shape from Second Life as a local Shape file (in XML Format). All that you want is to create a new Avastar character with exactly this shape.
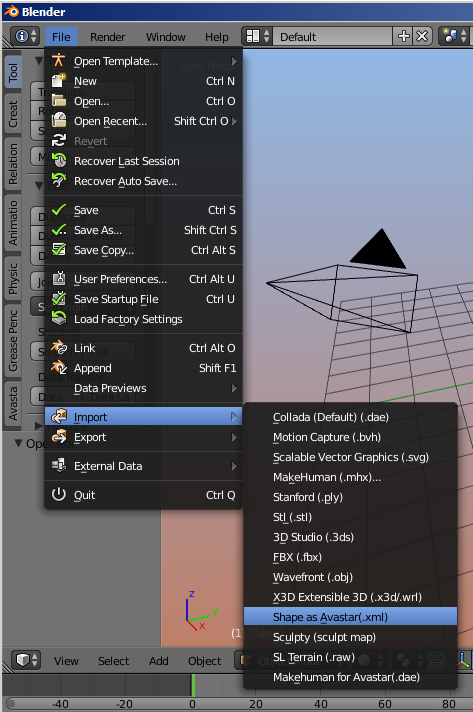
For this purpose we offer the XML Shape importer within the regular Blender Import menu (Also see the map in the zoom icon in the upper right corner of this page):
File -> Import -> Shape as Avastar
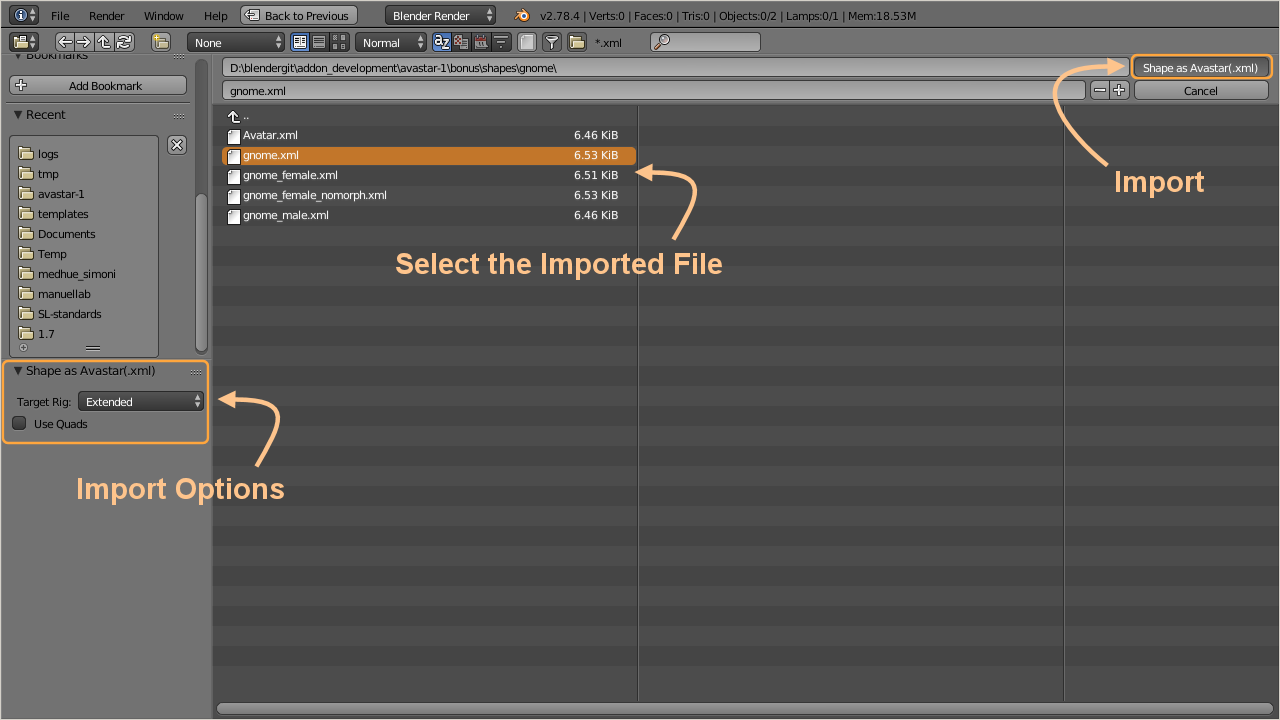
The Importer first opens a file selector where you select the XML shape that you want to import.
When you click the Import button then the tool creates a new Avastar character, and finally applies the imported shape to the new character.
Load Shape into existing Avastar
Loading a Shape file into your existing Avastar works almost identical to the previous scenario. The only difference is that now you already have an Avastar character in the scene. You select the Avastar character, and then you call the Shape importer just as described above.
The Shape importer figures that you have selected an Avastar Armature and automatically applies the imported shape to the selected rig instead of creating a new Avastar
Avatar Shape IO Panel
The Shape importer is also accessible directly from the user interface, in the Object properties of the Avastar Armature:
- Go to object mode.
- Select the Rig (RMB on the yellow circles around the mesh).
- Open the Properties window.
- Navigate to the “Object” properties.
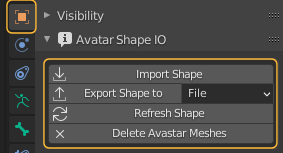
There you find a panel Avatar Shape IO. This panel displays a Preset selector and a subpanel with 4 main functions:
The Avatar Shape IO Options
Load Shape (Import a shape)
This function allows you to upload a Shape that you have previously exported from your online world: In most viewers there is a shape export option hidden in the advanced menu (“Advanced” -> “Character” -> “Carter Tests” -> “Appearance to XML”). This will silently create a file called:
[application_folder]\Roaming\Second Life\logsThis file contains your current shape and can be loaded into Avastar, where [application_folder] is the viewer’s application data folder. For Windows this folder is located at:
C:\Users\<username>\AppDataSave Shape to
Note: Some viewers support the upload of shape file to SL (e.g. Firestorm, Singularity). To see the file, switch to the Blender Text editor and locate Shape for: Avatar (Avatar stands for the name of the Armature). Useful when you need to update the shape in SL with the values from blender.
Refresh Shape:
Delete Avastar Meshes
Remove all Meshes of the Avastar character. You will want this when you use the rig for non human characters where keeping the Avastar human meshes make no sense.
Load Appearance Sliders
When you load a blend file which contains an Avastar Character, then the Shape panel sometimes only displays the “Load Appearance sliders” Button. This happens when you just have started Blender.
