The Material Presets Cheat Sheet
- start Blender
- in the 3D View: add -> Avastar
- in the N-Panel – Avastar: Open Material Presets
- Select a Material Preset
- Is Avastar installed ?
- Need to get started with Blender ?
- Blender docu is in Blender’s Help section.
- Find online docu: ALT + RMB -> Online Manual
The Material Preset Panel
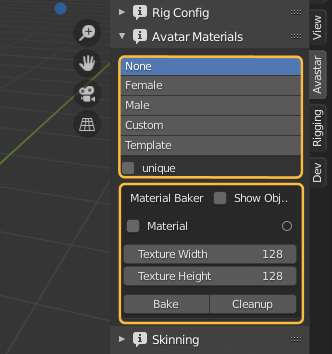
Whenever you create a new Avastar character, the Blender default Material (light grey, with white specularity) is assigned to all of the created Objects. Thus the character is displayed with a light grey surface. However you can assign your own materials to your character at any time.
Hint: When you come from Blender 2.79 or older
You will no longer find Blender’s face textures in Blender 2.80. We now can only use materials for texturing our meshes. The new Materials panel also provides a native bake tool to prepare more complex materials for export to SL (see further down on this page).
The Material Panel provides 2 Sections:
- Material Presets:
select from a collection of predefined Material Sets - Material Baker:
convert your Materials into exportable image textures
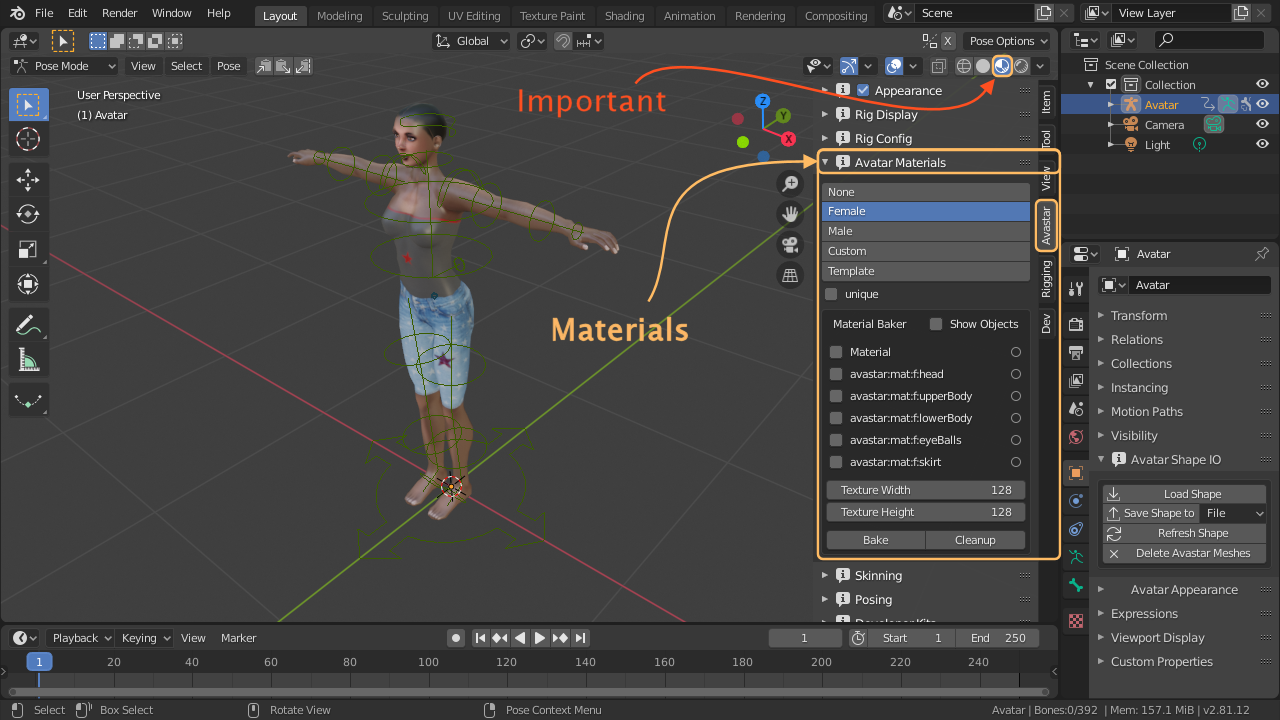
Material Presets Section
In the Materials Presets section you can technically select from 4 material presets, “Female”, “Male”, “Custom”, and “Template”. When you select a preset, then Blender will create a set of 5 materials for you: These Materials are for “eyes”, “head & lashes”, “upper body”, “lower body” and “skirt”.But Avastar does one more thing: It first checks if the materials have already been created. In that case it will NOT(!) add new materials but simple reuse the already existing materials. Thus materials can be setup once and then later reused for all your Avastar characters.
The material names follows a name convention:
avastar:mat:[f|m|c|t]:[eyeBalls|head|lowerBody|upperBody]
- avastar (literal constant)
- mat (literal constant)
- f|m|c|t (to distinguish the 4 template sets)
- [eyeBalls, head…] (Assigned part of the character)
Of course you do not need to use the presets for your work. You always can select your very own conventions and your very own materials. The preset selector only helps you to quickly setup a predefined material set.
The default Material is assigned to all meshes. Hence we see only one Material in the Material Baker List
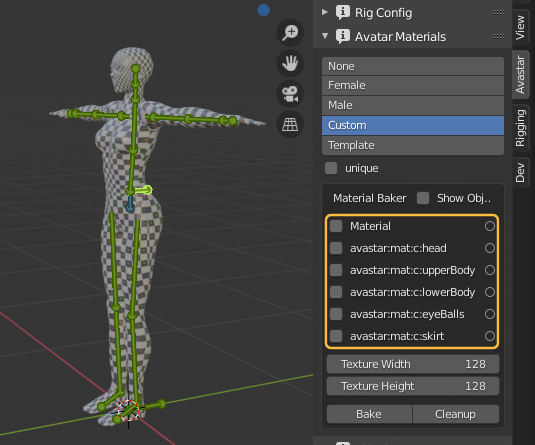
Although the custom Template uses a checker Texture for all body parts, note the body parts use separate materials!
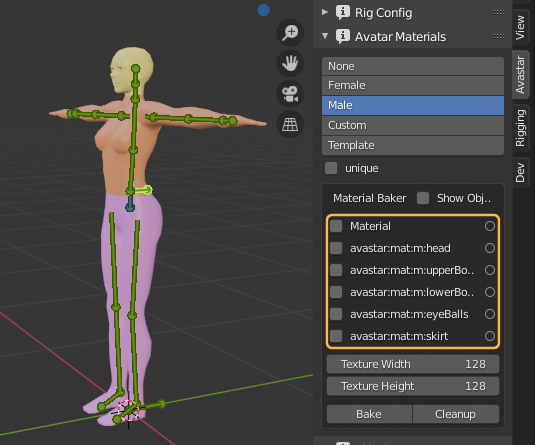
The Male template is a place holder for the Male Avastar model

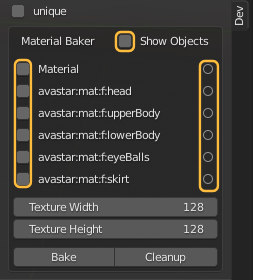
The Female materials are based on Eloh Elliot’s Starlight Textures. Note the clothing is added from complex defined materials with multiple textures
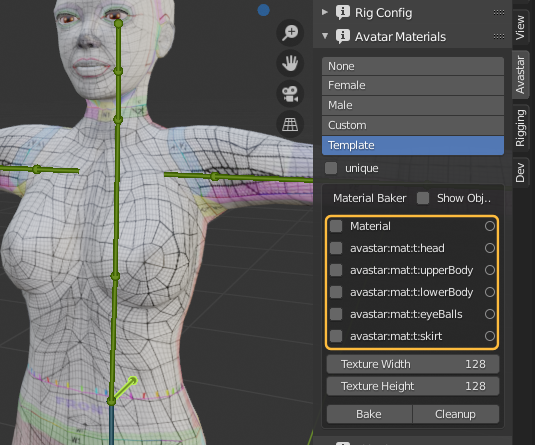
The template texture are used to help you texturise your System Mesh textures.
The Unique Option
Sometimes you actually do want to have multiple characters using different material sets, such as when you create a crowd scene. For this special case you can enable “Unique” option. Then Avastar will use a slightly different name convention for the material settings:
<rigname>:mat:[f|m|c|t]:[eyeBalls|head|lowerBody|upperBody]
- <rigname> The name of the Avastar armature
- mat (literal constant)
- f|m|c|t (to distinguish the 4 template sets)
- [eyeBalls, head…] (Assigned part of the character)
Thus even in this case you can preset your materials to a certain extent. such as if you typically create lets say 3 Avastars “Michael”, “Victoria” and “Sally” with their unique skins, then you can setup the materials as described in the previous chapter. Except that you replace “avastar” by the name of your character’s armature(s). Such as: “Sally:mat:f:upperBody”, “Michael:mat:f:upperBody”, etc…
Then you can go ahead as follows to let Avastar reuse your materials:
- Create an Avastar
- Name it according to your names (“Michael”, “Victoria” and “Sally”, whatever…)
- In the material preset selector enable “unique”
- select the correct preset
Material Baker Section
The upper part of the Bake Section just displays the list of materials assigned to the currently selected Mesh Objects (All bound objects if only the Armature is selected). When you enable the option Show Objects you get the list of objects using each Material in the list.
On the right side of the listing you see if an image texture has already been baked from the material
The lower part of the section provides 2 entry fields used to specify the image size of the baked textures (the default is too low, for good quality try 512*512)
- Bake: Bake textures for all selected materials
- Cleanup: Remove the baked textures from all selected materials
Important: A Bake can take a very long time (order of minutes!) Be careful
More detailed explanation
When you open the Shader Editor for the Materials of the Lower body, you see the Material is much more complex than just a simple image texture. In fact it is a combination of 3 different image textures woven together by using 2 mixing Nodes, Principled BSDF Shader and a material Output node:
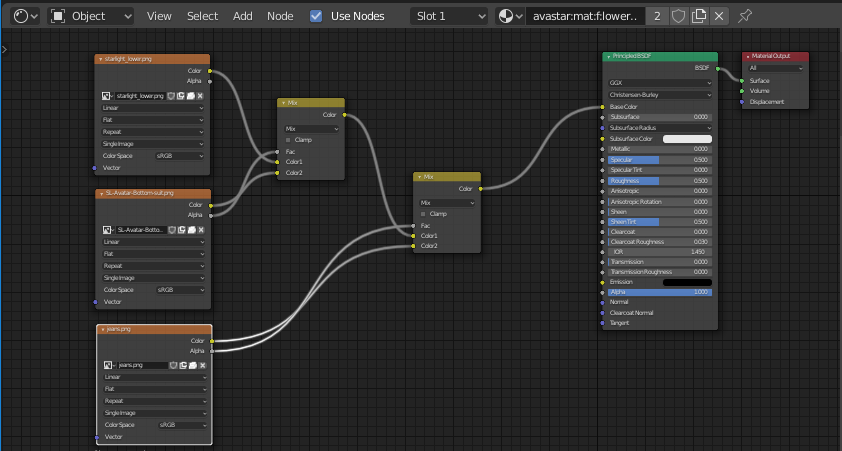
Note: If the terms do not tell you much, then please make yourself at least a bit familiar with the Shader Node Editor. Then you become a material expert in (almost) no time.
However, this material can not be transported to SL as it is defined in Blender. What we really need here is a way to create a single image (diffuse texture) for the entire material (i.e. we want to bake the material into a texture). this texture can later be exported by the Collada exporter and easily uploaded to SL as image texture:
The baked image is placed directly into the Material as additional unconnected Texture node. You find the node after baking placed directly below the principled BSDF Shader.
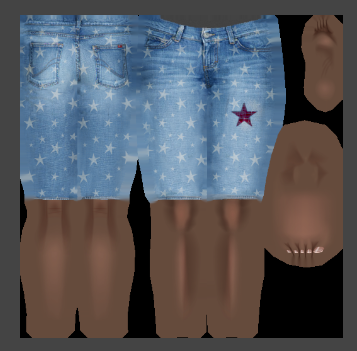
Baked texture: contains the combined Skin, Body and pants textures.
The Bake tool is not restricted to rigged Mesh. In fact you can use it for any material, even independent of any work for SL. It is a general bake tool for any kind of materials.