Animating

This document is about how to create your first Animation using Avastar. For the begin we will create a three frame animation. This is just to get you started. As your experience grows you will learn much faster ways to pose and animate your character.
Preparations
How to add a new Avastar Character - Read more...
Adding a new Avastar
You can add a new Avastar Character only when Blender is in Object mode. You navigate to the Add -> Avastar menu and select from one of the rig types:
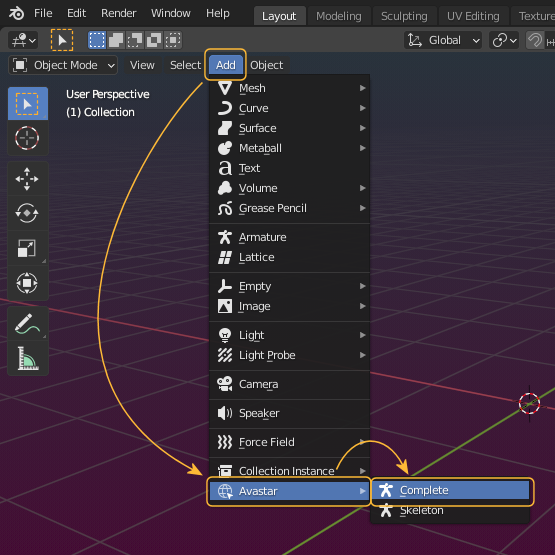
- The Complete variant is the full Avatar with all Bones including the Classic bones, the Bento Bones and the Fitted mesh Bones and a few more bones for various purposes (IK, structure, Animation, …)
- The Skeleton Variant only loads a Skeleton without Meshes. this is useful for example when you want to make a creature Rig where you do not need the Avatar meshes at all.
- Note for long time Avastar users: You can add back the old variants in the Avastar Preferences window
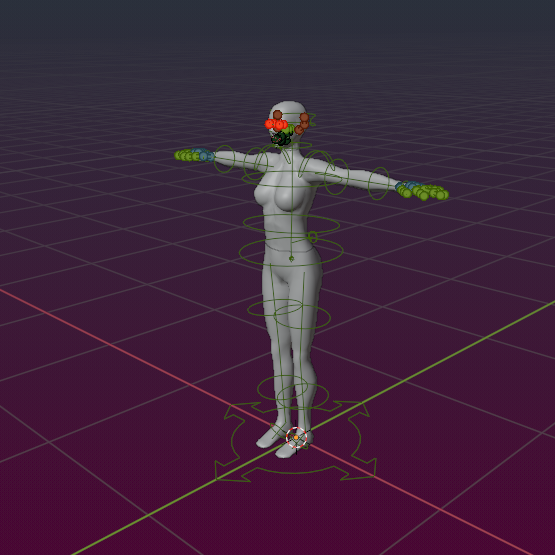
After a short time (typically 2-4 secs) a new Avastar character is created in the 3D View and at the center of the 3D View .
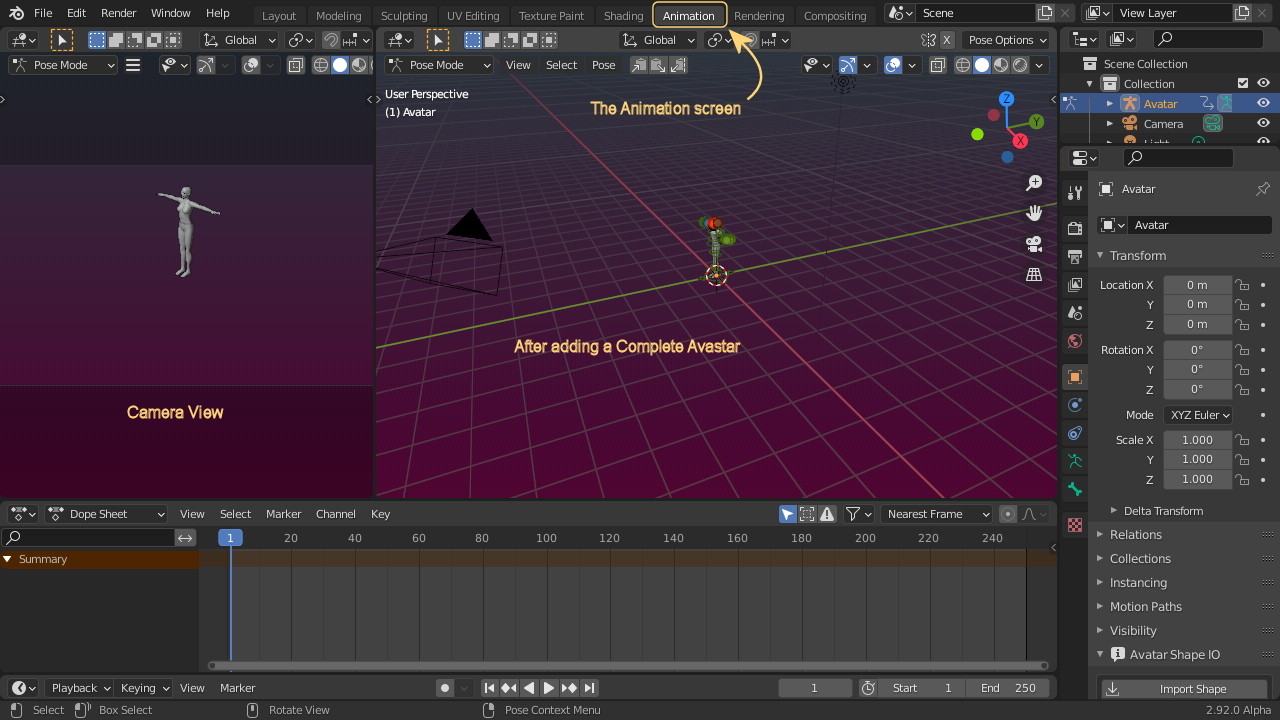
Now we switch to Blender’s default Animation screen. You do this from the Top menu Bar.
Note: Of course you can switch to whichever screen you prefer instead. But note that you will want access to the Timeline, the 3D View, the Dope Sheet and the Properties Editor.
Details about the Animation environment
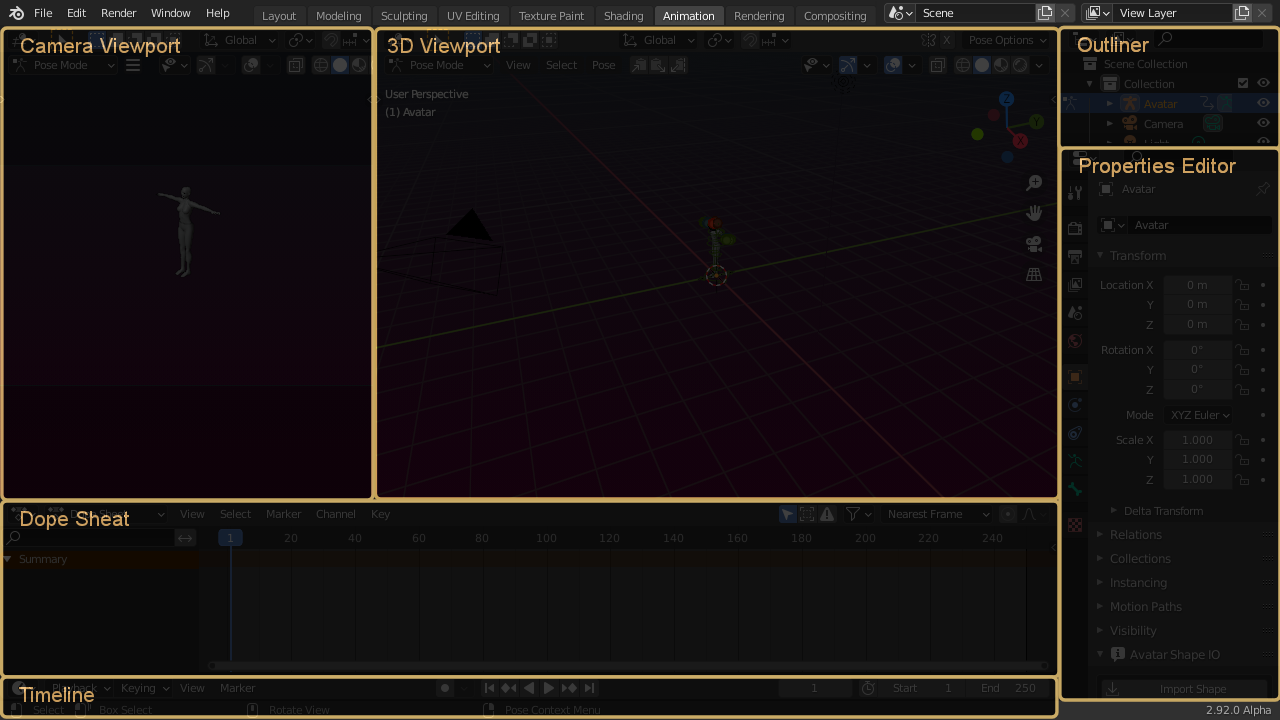
Here is an overview of Blender’s default animation screen. You see the sections:
- Camera Viewport
- 3D Viewport
- Outliner
- Properties editor
- Dope Sheet
- Timeline

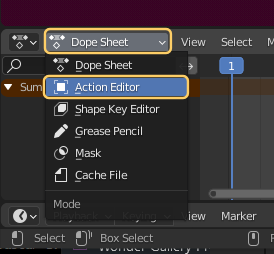
In the Dope Sheet switch the Mode from Dope Sheet to Action Editor within the pop up menu in the header.
Hint: If the Dope Sheet Pop Up menu does not show, then move the mouse over the menu bar of the Dope Sheet window, then press middle mouse button and while keeping the MMB pressed, drag to the left side.
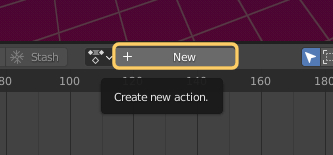
In the Action Editor mode you can create new Actions. You find the corresponding pop-up menu in the Dope sheet menu bar:
Press the white plus sign to get a new action and name it “FirstAnimation”.
Remind: If you do not find the Actions menu on your screen, then MMB -> drag to the left (as described above)
Hint: you can edit the action name right inside the pop-up menu.
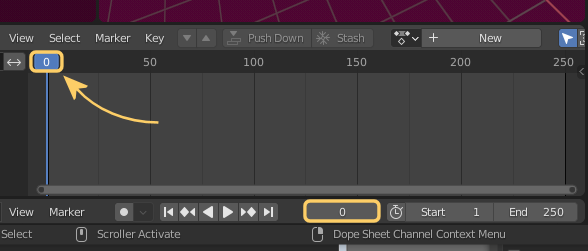
Adjust the Dopesheet (and timeline)
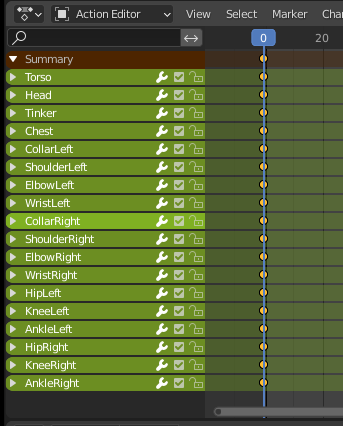
On the Dopesheet move the first frame of your animation to zero. You can do that either by dragging the blue progress indicator until the position indicator displays “0”, or by immediately typing “0” into the position indicator as marked on the image below.
Hint: Use the scroll wheel on your mouse to zoom the window in and out and the middle mouse button (or hold down Alt) to pan.
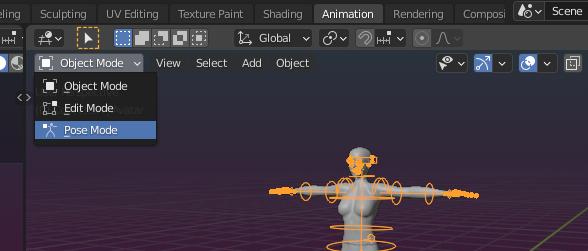
Create the Start frame
I assume that you are still in Object mode now. In the 3D Viewport make sure that you selected the armature by left-click on one of the rings surrounding the avatar. The rings should now display in bright orange.
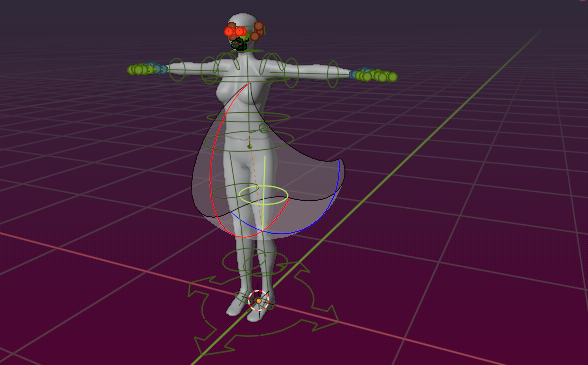
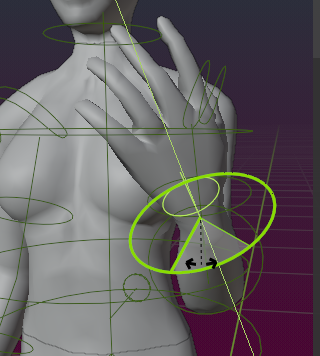
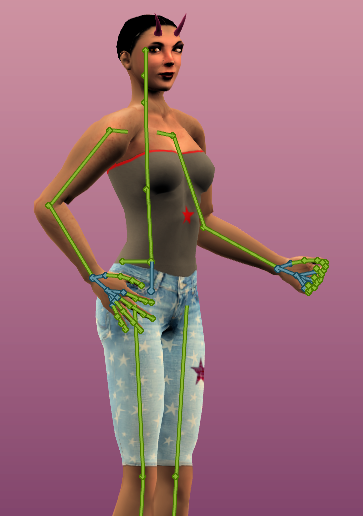
… while playing with the Pose you will note that we have placed a few constraints to the various parts of the skeleton. We did this mainly to keep you from ripping the character into pieces by dragging the bones to unrealistic positions. The maximum rotation is shown by default when you select a pose bone. The shallow surface indicates where the bone tip (tail) can be placed (see image)
Note on Rotation
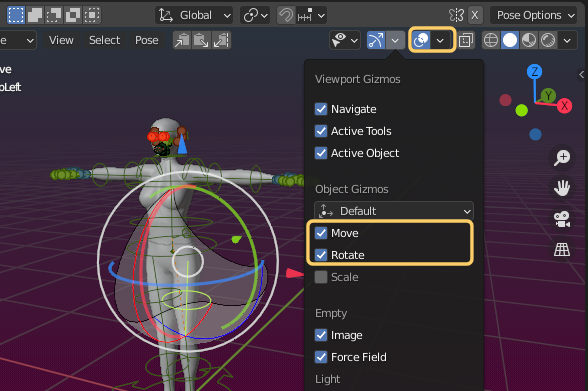
The easiest way to rotate the bones is to use the rotation manipulator controls. For your first steps you may want to select the curve segment in the 3D Manipulator widget so Blender will show the rotation manipulators when you select a bone:
You may want to use the Rotation mode “Normal”. I found this the most convenient mode when working with the mouse.
As you get more experienced with Blender you will use keyboard shortcuts more and more. Maybe you will even skip the 3D Manipulator after a while when you realize how efficient the usage of shortcuts actually is.

You might find the 3D viewport is now a bit overcrowded. I found it actually easier to not see the bone limitations while posing. Blender can hide those indicators.
Note: We have added this switch also to the Avastar Rig Display Panel just for convenience (the button is named Limit in our panel, but it actually does the same as the Relationship lines button. See in the next section More Animation Details…

More Animation details
We recommend you skip this chapter when you came here for the first time and when you just want to get your first animation to work. Of course you later can get back here for further reading.
More about Rig Display Properties
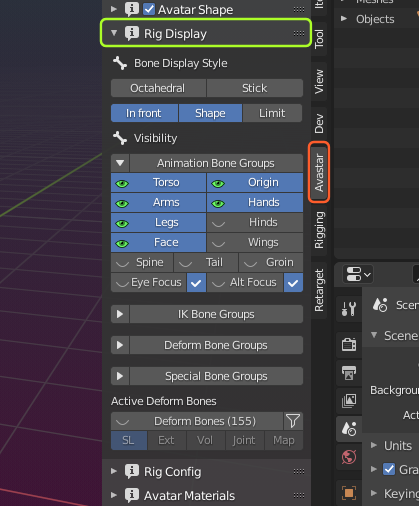
You have full control over which parts of the Rig get displayed at a given time. You find the Rig Display Panel in the Properties panel (N-Panel) within the 3D Viewport. If you do not see the N-Panel, then move the mouse into the 3D Viewport and press ‘N’.
BTW: I have indicated where you can disable the Relationship Lines as we did above. The Limit button is a convenience addition, we found it was a lot easier compared to the Blender way. But you decide what you find best for you.Below you find a more comprehensive documentation of the Rig Display Panel.
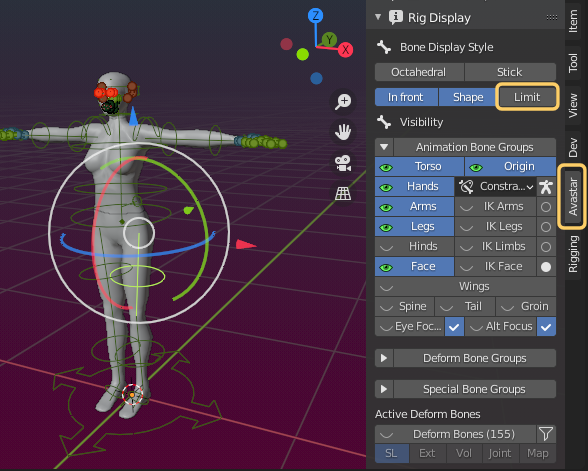
Lets make one final adjustment for now, that is: we do not yet work with face and hands, so we can safely hide those parts of the rig (check in the image aside), it is self explaining…

More about the Rig Display
The Rig Display panel gives you full control over which parts of the Rig can be seen at a given time. By default only the Control bones are visible. But sometimes it is desirable to hide or unhide parts of the Rig.
Furthermore the control bones (green) use custom shapes by default. That is, they are formed as rings which are placed around the Avastar body. The benefit of the custom shapes is that they can be selected easier. But sometimes it is desired to switch from Custom shapes back to Blender’s default shapes (Sticks or Octahedrons).
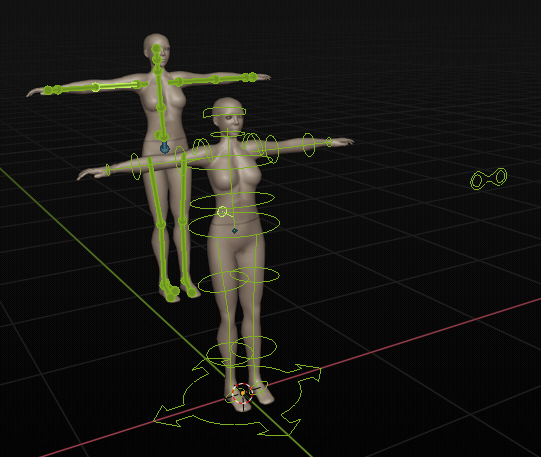
Character in the Background: Bones as Sticks
Character in the Foreground: Bones with custom Shapes
Panel Overview
The Rig Display panel basically contains a collection of properties which also are available at other regions in Blender. But having them all in one place is a time saver. The Rig Display panel has 6 major sections:
- Bone Display style.
- Bone Visibility.
- Animation Bone Groups (expanded by default)
- IK Bone Groups (collapsed by default)
- Deform Bone Groups (collapsed by default)
- Active Deform Bones (collapsed by default)
- Special Bone Groups (collapsed by default)
Bone Display Style
The first row of buttons changes the bone shape. You can select between the Octahedral Style and the Stick Style.
Note: In the Armature Data Panel (Properties Window) you have 3 more options for setting the Rig display style
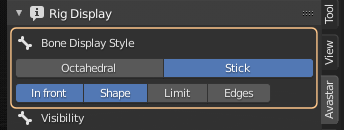
In the Second Row of the section we find 4 properties:
- In front: To display bones even when they are occluded (hidden) by the mesh.
- Shape: To enable the usage of Custom shapes.
- Limit: To display the bone movement ranges.
- Edges: Show edges in object mode (only displayed if active Object is a Mesh)
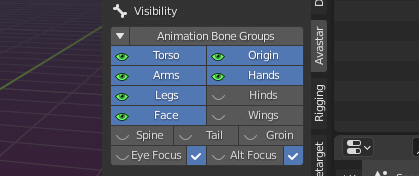
Bone Visibility
In the Bone Visibility panel you can hide/unhide various bone sets. The panel is subdivided into 4 major groups as follows…
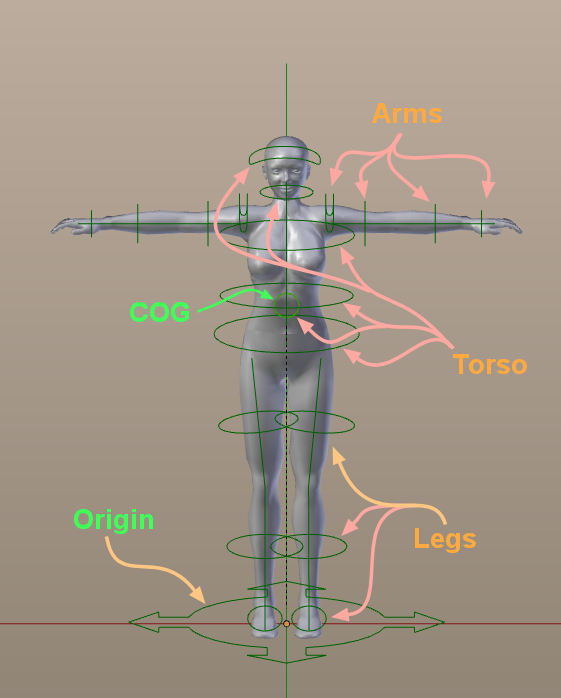
Animation Bone Groups
- Origin: The Root bone of the Armature (use only for placing the armature in the scene)
- Torso, Arms, legs, Hands: Main Body Bones
- Hinds: Additional Bento bones for Quadrupeds
- Face, Wings, Spine(*), Tail , Groin: More Bento bone sections
- Eye Focus, Alt Eye Focus: Special bones used as Focus point for the eyes. The Alt Eye Focus is for the Bento Face (Alt Eye Bones)
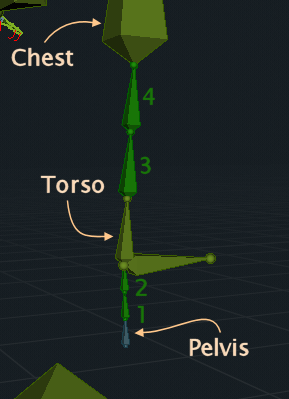
More about the Spine
The Spine is made of 4 Bones which are by default folded in such a way that they do not disturb the behavior of the System Character
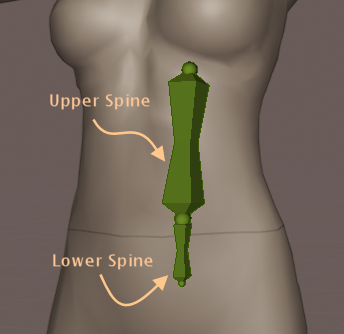
In the image aside the upper Spine bones (Spine3 and Spine4) and the lower Spine bones (Spine1 and Spine2) have been unfolded and are marked in dark green. You see how they are embedded between the Pelvis, Torso and Chest.
Note: You can fold/unfold the spine from within the Rig Config panel
IK Bone Groups
These buttons control which of the IK Bones (yellow) are visible
- IK Fingers (Simple, Constrained, Hand Grab)
- IK Arms
- IK Legs
- IK Limbs
- IK Face
The circles on the right side indicate if the IK bones are disabled (circle) or enabled (filled circle)
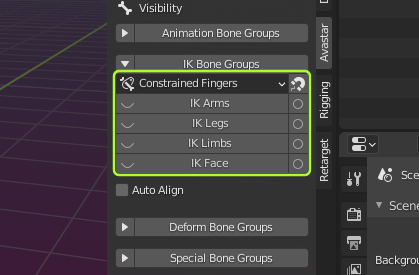
Note: The Magnet icon right to the IK Fingers applies the current visual pose to the FK Bones.
Option – Auto Align :
- When you switch on IK, then the IK Bones are aligned to the current FK Bone setting.
- When you disable IK, then the FK Bones are aligned to the current IK Bone setting.
Deform Bone Groups
Display all bones which have the Deform Option enabled. The content of this set can change dynamically (see fitted Mesh)
- SL Base: to display the SL Bones (Blue)
- Volume: to display the Volume Bones
- The others: Bento Bone Groups

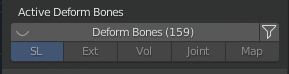
Active Deform Bones
The Active Deform Bones are Bones which have the “Deform Flag” set. Only Active deform Bones can modify the mesh (via skeletal animation) when they have an associated Weightmap.
The Active Deform Bones can be filtered by 5 categories:
- SL: The 26 Animation Bones for SL
- Ext: Bento Bones
- Vol: The Collision Volume Bones
- Joint: Bones that have modified Joints (Joint Edits)
- Map: All deform bones which also have Weightmaps (only shown when a mesh is selected)
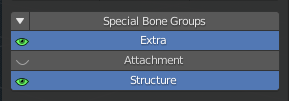
Special Bone Groups
- Extra: There are a few Extra bones which usually are not used for Animation in SL. These bones are either not weighted to the default Avatar (Skull, Foot Bones and Toe Bones) or are automatically animated (Eye Bones). However you can use these Bones in your animations for custom meshes.
- Attachment: to display the Attachment Bones (red)
- Structure: to display the Structure bones
More about the Skeleton
As explained above we can now move and rotate the skeleton as we like. We see that the mesh moves along with the bone movements and we will finally end with our initial start pose on frame zero of the animation (where you want the bones for the start pose) Remind that we are only moving and rotating the green skeleton handles for now.
Animation Bones
All the green skeleton handles are the Animation Bones and act as FK (forward-kinematic) controls. Those are the bones you use for posing and animating.
Some of the Animation Bones have been given circular shapes so they lie outside the avatar and are less visually distracting from the meshes. When a bone displays in light green then it is selected and will react on your move, scale and rotate commands. You can select single bones by left-Click, or add bones to the selection by SHIFT left-click.
The Control Bones (and the IK Bones) are used for Animation.
The Avastar Skeleton has 2 more Control Bones with very special properties:
The COG
Center of Gravity bone. Use this bone to set the location and rotation of the character. Avastar adds the COG bone movements to your animation. the COG movements are later mapped to the mPelvis bone of the target skeleton.
The Origin
All movements are relative to the Origin bone. In other words: Moving the Origin bone around will not affect the exported animation in any way. If you are doing multiple character animations you can use the Origin to set their locations to where you later want to position your pose balls. Once you are happy with the location hide the Origin (See Rig Display panel).
SL Base Bones & Collision Volumes
Besides the (green) SL Control Bones we find many other bones in the Avastar Rig. We especially have three subsets of bones named the (blue) SL Base Bones, the (purple) SL Extended Bones (also named Bento bones) and the (orange) Collision Volume Bones.
These three subsets of Bones are only used for weighting (skinning) your character or attachment. But they should never(!) be used for animating your character.
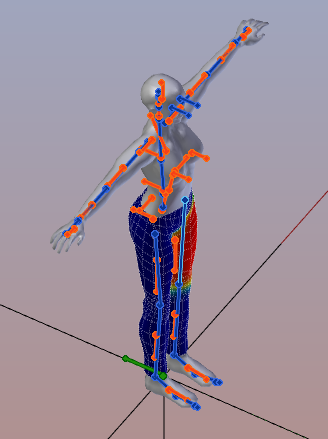
Never directly use the SL Base Bones and the Collision Volumes for animating! You create Animations only with the green Control Bones and the IK Bones.
Mandatory rules (To pin down on your desktop)
- Weight only the blue SL Bones, the Purple SL Extended Bones and the orange Volume Bones.
- Animate only the green Animation Bones (and possibly the yellow IK Bones).
- Never add weight to the green Animation Bones.
- Never use the blue/purple/orange Bones for animating.
Store the Intro Pose manually
Once you are happy with your first frame posture you need to store your pose into an animation (or action). In animator terms this is named “adding keyframes” for all posed bones. Blender provides a range of tools for doing this.
The basic albeit not the easiest method is to select all the posed bones, then press i to insert a new key frame, and from the popup box select “Rotation” (see image).
Note: Almost always you need to set only Rotation key frames. The exception is if you are moving the COG or IK control bones, in which case you should set the location too by choosing “Location & Rotation“.
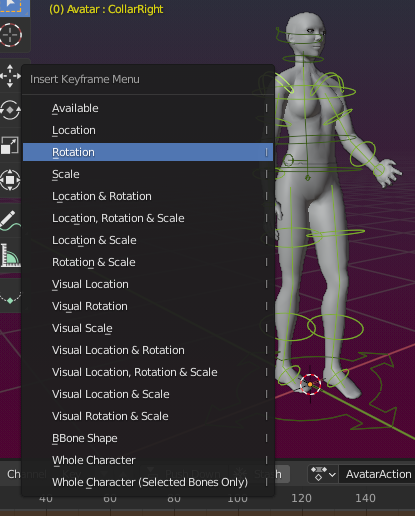
Very Important: Never use the Keyframe option Whole Character! This option would insert keyframes for all 139 bones (visible and invisible). The Avastar Animation exporter will complain about too many bones in Animation.
Note for Experts: You do not need to create a starting T-pose. The .anim format doesn’t need it and Avastar automatically inserts the required reference frame for the BVH format.
Store with the Auto Keying Tool
The above described keying method works. But there is one issue with that: How can you know which bones you have posed? Basically you need to remember this on your own.
But this is not very convenient. Blender has got a solution for you which is named “auto keying”, where basically all modified bones are automatically keyframed as soon as you move or rotate them around.
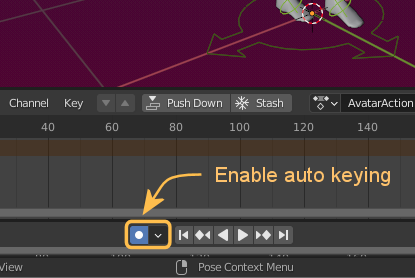
Warning: The autokeying tool also comes with a caveat as it automatically keys even when you just want to try out something without wanting to actually keyframe it. This way you can easily spoil your animation without noticing. To solve this situation we have added yet another tool in Avastar…
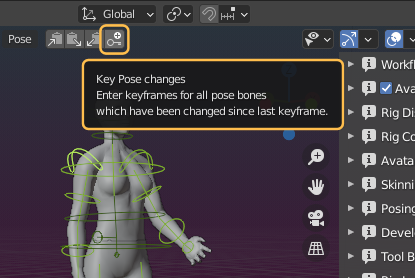
Store with the Avastar Smart Keying Tool
Important: Please make sure that you have disabled the Auto Keying Tool that I described above!
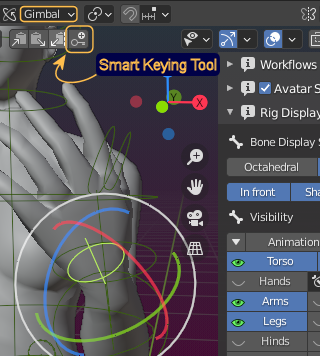
The Smart Keying Tool examines on request (when you click the button, see image) which bones need keyframes and adds only those bones into your action which actually have changed.
Since this tool only inserts keys when you explicitly tell it to do so (by clicking on it) you can first try out various poses, and only when you are satisfied, then you call the smart keying tool which then will figure out which keys you actually need to add to the animation.
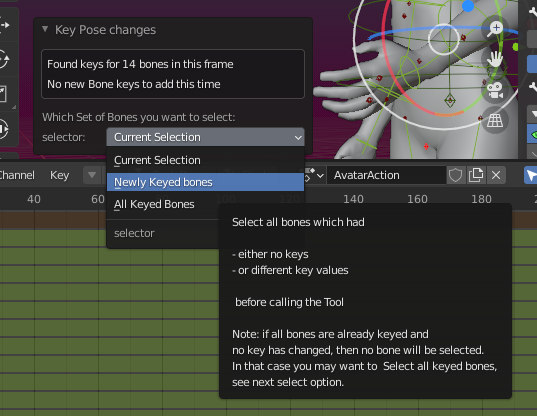
When the Smart Keying Tool is finished, you find some adjustment settings in the Operator redo Panel, basically for selecting the collection of bones of which you are most interested…
I will use the Smart Keying Tool for most part of this document, just because it is so easy to use and it almost never fails. But please feel free to use whichever keying method you prefer to use. So lets move on and take a quick look into …
The SL-Animation Workspace
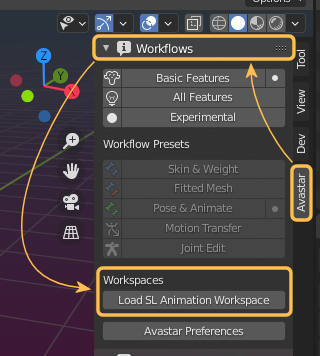
Blender’s default Animation Workspace is fully OK to use. However we found to make some small changes to the Workspace Layout. But instead of letting you do all the small adjustments, we have added our own SL Animation Workspace. You can get to this workspace in two steps.
First: Open the Avastar Workflows panel and locate the section for Workspaces (at the bottom of the panel). There Load SL Animation workspace.
The button now has changed its label to SL Animation Workspace loaded and it is also no longer clickable, see image.
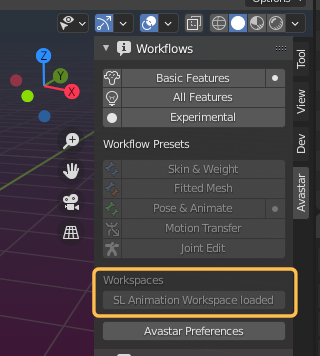
Now you find the SL Animation Workspace in the Top Blender menu Bar. This workspace will keep available for you if you store your Blendfile. Then the workspace will stay available whenever you reload the blendfile again.
Note: You can delete the Workspace with a Right Mouseclick on the label there you find the delete option.
Now lets use the SL Workspace if you like so (the camera view has been replaced by the Dope Sheet and the Dope sheet has been replaced by the Animation Curve editor) and get back to our Animation task…

The Action Editor
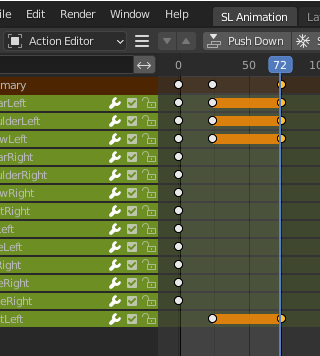
Once you have keyframed your initial pose as described with the various methods mentioned above, then you should see the Action Editor has been populated with the bone names and a yellow diamond at frame 0.
Note: You must select bones to see them in the Action editor.
More about the Action Editor ...
Disabling parts of the Action
If a bone is not listed in the action or when it is marked as disabled, then it is not controlled by the animation.
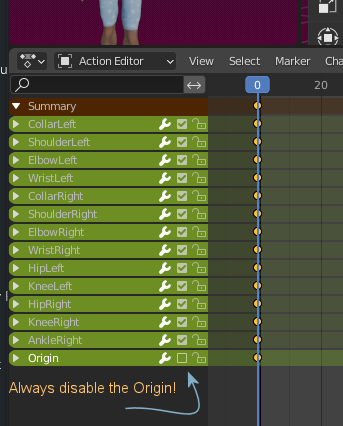
You can disable the animations for single bones by clicking on the little checkmark icon next to the bone name.

Always disable the Origin!
In Blender you can animate the Origin Bone of the Armature. But this bone’s animation can not be used for SL Animations. So, if you want to check your animation how it will look in SL, then you either should not at all animate the Origin bone, or at least disable it from the Animation.
Note: When you want to move the Avatar then use the COG Bone in the center of the Character. This bone is linked to the mPelvis bone of the SL Rig.
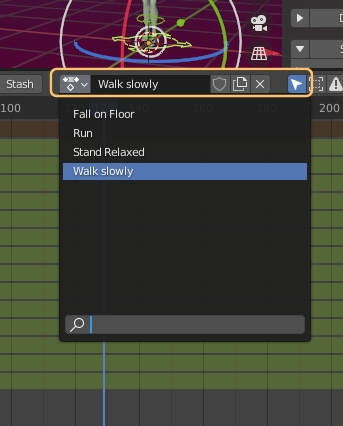
Multiple Actions in one Blend file
In more advanced work you will come to a point where you want to support a few independent but related Actions for your model. In Blender you can define as many actions as you want within the same Blend file.
You create a new Action by clicking on the [+] icon in the Action selection menu.
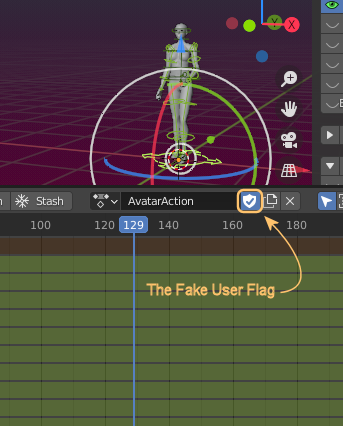
Avoid loss of Animations
You can instruct Blender to keep the action under all circumstances by enabling the Fake User Flag left to the plus sign. No kidding, this is Blender’s official term for this flag!
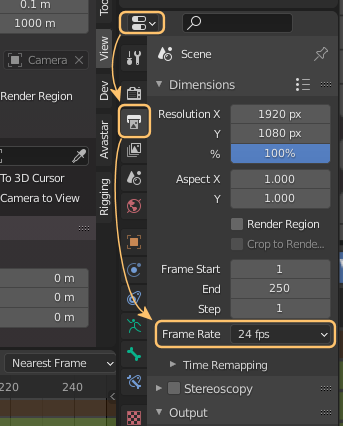
Animation Frame Rate
Lets assume we want to play our animation with Blender’s default Frame rate of 24 fps (frames per second). However, if you may want to use a different Frame rate, you can change Blender’s frame rate in the Scene Output properties editor, see image aside.
Important: When you later export your animation then the frame rate is not the most important property. Simply put the animation plays exactly as long as it plays in Blender, so if your animation runs for 5 seconds with a frame rate of 100fps and when you export with that framerate, then the animation will later play equally for 5 seconds in SL.
Ok, lets keep with 24 fps.
Move to next Animation Frame
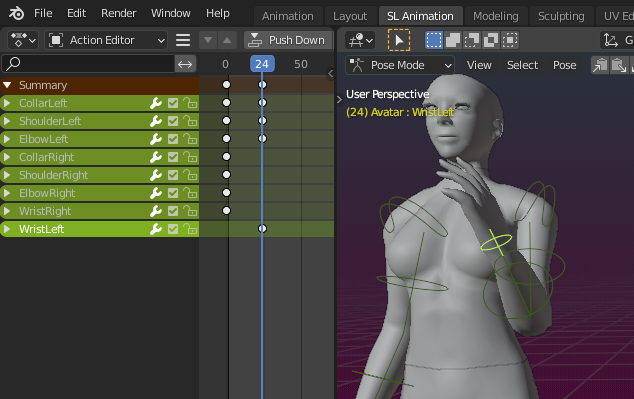
- Now Click on the timeline on frame 24 which is one sec later (see image below) in the animation.
- Repose the avatar how you want it to appear one sec later and again use the Smart keying tool to insert all necessary keys. I propose you start with something simple like a bow or waving a hand like queen Elizabeth for your first animation.
- So we move the left hand upwards until it is in the waving pose (see image), then we use the Smart Keying Tool to get all necessary keys into the Animation.
Now we could advance to the next second on frame 48, pose the rig, keyframe, move to the next frame… and so on. But i suggest we hold on for a minute and first think about what we want to achieve.
What we really want to achieve is some sort of a looping hand wave animation, so we actually want to animate just one wave and then repeat this in an endless loop. The loop shall begin at frame 24 and end at frame 72. And then it shall jump back to frame 24 and repeat. So…
Here is a nice tip to get something that works right away:
For a smooth endless wave animation we use the exact same Pose on the last frame of the loop (72) as you have used on frame 24 (the first frame of the loop in our case). This way we can later configure the animation to jump back from frame 72 to frame 24 in an instant and repeat the animation from there without seeing any weird jumping when the loop is reentered.
So what we actually want is to copy frame 24 to frame 72…

- Make sure you are in frame 24
- Select all bones for which you have keys in that frame (white blobs in the timeline) by clicking on the topmost white blob in the summary line
- You will see the blob color changes from white to orange

- Make sure all blobs on frame 24 are orange
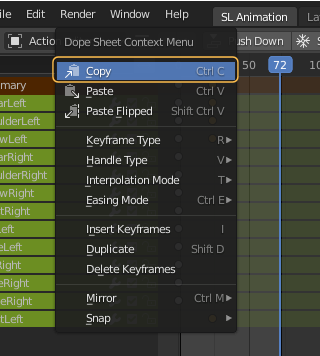
- Then, while the mouse is still in the action editor, press CTRL C on the keyboard, or right click somewhere into the Action Editor, then Select the Copy tool (see image)
Tip: You can move the blue frame marker already to frame 72 (see image) or you can let it where it is, it does not matter for the Copy part
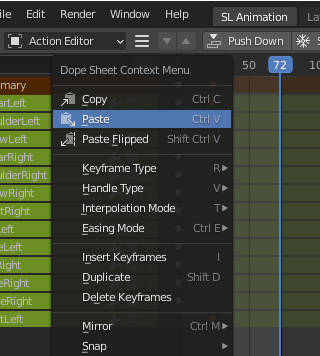
- Now make sure that your blue frame marker is on frame 72
- Then press CTRL Z on the keyboard or click somewhere into the Action Editor, then Select the Paste tool (see image)
Now your Action editor shows some bright orange lines indicating that the keys on the left and on the right actually are identical. And this is exactly what we want. Remember we want frame 72 be identical to frame 24, so we are happy for now.
Next we will add the wave position at the center of the loop which is frame 48 in our case.
- Move the frame marker to frame 48
- Make sure that your Rotation Gyzmo is in Gimbal mode (see image below)
- Select the wrist and rotate only the Y axis of the wrist bone (the green circle of the rotation gizmo) until the hand starts tilting downwards.
- Use the smart keying Tool to create all keys for the pose
- You will now see that the WristLeft bone has now a new key on frame 48 in the action editor
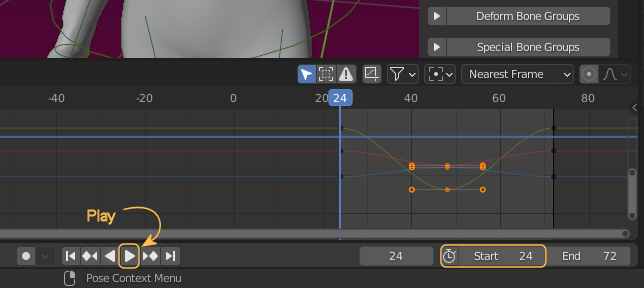
- And in the Curve editor you now can see a nice smooth animation curve for WristLeft
- As a side note: I have also set the Endframe of the Animation to 72
You now can move the blue frame marker left-right to see how your animation plays

Tip: Set the Startframe to 24, then Play the animation. Now you can inspect if your wave works great or if it has issues.
If you think the animation is not yet perfect, then you can add all sorts of tweaking, add more keys, also key other bones of the arm, etc.
But the general advise is: keep it simple, that way you later understand better why rig animates in just that weird way.
Prepare the Export
You find the Animation Export panel in the Render Properties section of the Properties window.
Hint: We also support BVH Export
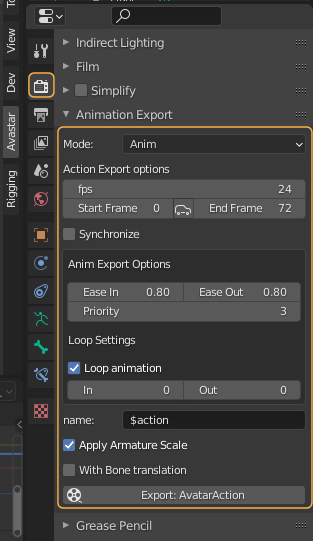
- Make sure the mode is ANIM
We also support the BVH format, but we recomment to use Anim because you will not loose any precision when you work with very small animation differences. Note that the Anim format is used by SL internally, so your BVH will be converted to Anim by the SL Importer.

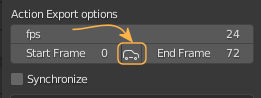
- Use the manual synchronization to make sure your startframe, endframe, and your fps settings match to the current action
- You can enable the Synchronize button. Then any changes in your action will be automatically propagated to the Animation exporter.
- Remember that the animation shall loop between frame 24 and frame 72
- But frame 24 and frame 72 are identical
- So the loop actually either starts at frame 25(IN) or stops at frame 71(OUT)
- Also enable the loop animation option, otherwise the animation won’t loop in SL
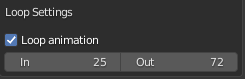
Hint: Since frame 24 and 72 are identical, we only need one of them in the loop. otherwise we see a tiny small stutter in the animation when the loop restarts.
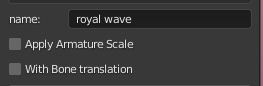
- You can name your action as you like, when you keep the name $action then you will automatically get the action name from Blender.
- Disable Apply Animation Scale. this is only important when your Armature has been scaled up or down
- Disable With Bone translation. So far we have only used Rotation
Hint: The COG bone is the only bone that is always exported with translation enabled, even if it has not been moved. The COG bone is later mapped to the Avatar’s mPelvis in SL.
Now you are ready to …
Export the Animation
- Finally, export the animation by clicking on the Export : royal wave button. Avastar then asks you for a filename and location which by default will take on the name of the action you had set before.
- Once saved, fire up your Viewer, and from the file menu select Upload then Animation. Find and upload your animation, it will appear in your Animations folder.
- Run your first animation and show off your creation.
Note: If you don’t see the animation play out, you may need to switch off your AO. This happens if the animations in your AO have been badly designed and are running at the highest priority).
Final words
This tutorial has only scratched the surface of what is possible. Things you will want to explore next are using the IK controls, looping part of the animation, animating only certain bones, using the Graph Editor…